Analysis
Game uses PS5 system calibration settings, but changing the in-game HDR sliders will force the game to use the calibration settings of the game. Make sure the PS5 system HDR calibration settings are set correctly. If, after adjusting the HDR of the PS5 system calibration settings, you are still not satisfied with the result of the game image, then use the information below to adjust the in-game HDR setting sliders.
The game seems to not use the Xbox HDR system calibration settings. In the case of Xbox, also use the information below to adjusting.
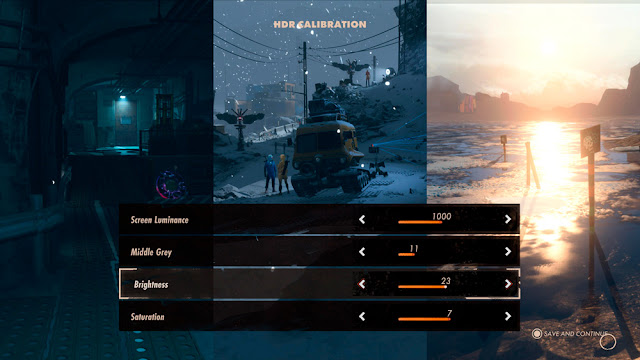
There are several options in the game settings:
- Screen Luminance - adjusts the peak brightness (i.e. the brightness of the brightest light sources, such as the sun, lamps and etc.)
- Middle Grey - adjusts the mid point (balance of light and dark areas).
- Brightness - adjusts the overall image exposure and peak brightness.
- Saturation - adjusts the color saturation.
Setting the HDR of the game is difficult due to several problems:
- The actual peak brightness of the lights differs from the value set on the Screen Luminance slider. For example, with the default value of the Brightness slider (12), the actual peak brightness of the lights will be lower, causing the lights to appear dim.
- Peak brightness also depends heavily on the value of the Brightness slider and slightly depends on the value of the Middle Grey slider.
Try to find data about the peak brightness of your TV on the site RTINGS.COM (value HDR peak brightness 10%). Before adjusting, make sure you have set the TV settings correctly.
Quick Way to Set Up
Do it if you can turn off your TV tone mapping.
Leave the Middle Grey slider value at 11 and Brightness slider value at 12.
Adjust the Screen Luminance value using the rule: the sun in the third test image should be at maximum brightness, but the clouds and sky around the sun should be clearly visible. Also you can use the table below if you mean the brightness of your TV.
| Screen Luminance Slider, Clicks (Brightness = 12) | Actual Peak Brightness, Nits |
|---|---|
| 300 | 220 |
| 400 | 300 |
| 500 | 355 |
| 600 | 420 |
| 700 | 490 |
| 800 | 550 |
| 900 | 620 |
| 1000 | 680 |
| 1100 | 740 |
| 1200 | 800 |
| 1300 | 870 |
| 1400 | 920 |
| 1500 | 980 |
Adjust the saturation slider to your preference.
Difficult Way to Set Up
If the actual game image is still too dim for you, or if your TV's peak brightness is well over 1000 nits and you can't adjust using the previous method, then you can do the following.
Set the Screen Luminance slider to the exact value of your TV's peak brightness in nits.
Increase the value of the brightness slider to a value of 20-24 using the table below:
Depending on the peak brightness of your TV, find the corresponding table cell with a green fill and determine the desired value of the Brightness slider.
Note that since you've increased the brightness of the entire image, you may have degraded the black level (the contrast of dark areas is low and colors appear washed out). You can try decrease the the Middle Grey slider by a few values but this does not compensate for the loss of black levels. When adjusting the Middle Grey slider, follow the rule: you should be able to see details in the shadows and in the bright areas quite well.
Adjust the saturation slider to your preference.
Dynamic Tone Mapping Way
Your TV always does tone mapping and you can't turn it off. In this case, setting the peak brightness does not make sense.
Set the value of the Screen Luminance slider to the maximum and adjust the value of the Brightness slider to an acceptable value.


Post a Comment